

How To Send Commands To Alexa Web Service
Amazon Alexa Custom Skill
I want to build custom commands to use with Repeat
The built-in Alexa integration allows you lot to integrate Home Assistant into Alexa/Amazon Repeat. This integration volition allow y'all to query information and phone call services within Home Assistant past using your voice. Home Assistant offers no built-in sentences only offers a framework for you to define your ain.
Requirements
- Amazon Developer Account. Yous tin sign on here.
- An AWS business relationship is needed if you want to use the Alexa Custom Skill API. Function of your Alexa Custom Skill will be hosted on AWS Lambda. However, you don't need to worry about the toll, as AWS Lambda allows for free to apply up to ane million requests and 1GB outbound information transfer per month.
- The Alexa Custom Skill API also needs your Home Banana instance to be accessible from the cyberspace via HTTPS on port 443 using a document signed by an Amazon canonical certificate potency. This is then account linking tin accept place. Read more on our blog about how to gear up encryption for Domicile Assistant. When running Home Assistant OS or Supervised, using the Duck DNS addition is the easiest method.
Create Your Amazon Alexa Custom Skill
- Log in to the Amazon developer console
- Click the Alexa button at the top of the console
- Click the blue "Create Skill" push in the superlative right
- Model to add together: Custom
- Proper noun: HomeAssistantIntentsSkill (or whatever you want to call this skill)
- Method to host: Provision your own
You tin use this specially sized Home Assistant logo as the large icon and this i every bit the minor 1.
Create Your Lambda Function
The Alexa Custom skill will trigger a AWS Lambda office to process the asking, we will write a small slice of code hosted as a Lambda function to basically redirect the request to your Domicile Banana instance, so the Alexa integration in Dwelling house Assistant will process the request and send back the response. Your Lambda function will deliver the response dorsum to Alexa.
OK, let's go. You first need sign in your AWS panel, if yous don't accept an AWS business relationship nonetheless, you tin can create a new user hither with 12-month free tier do good. You lot don't need to worry about the toll if your business relationship has already passed the first 12 months, AWS provides up to ane one thousand thousand Lambda requests, 1GB of outbound data and unlimited entering data for gratuitous every month for all users. See Lambda pricing for details.
Create an IAM Role for Lambda
The starting time affair y'all need to exercise afterward you sign in to the AWS console is to create an IAM Role for Lambda execution. AWS has very strict access control, you accept to explicitly define and assign the permissions.
- Click
Servicein top navigation bar, expand the menu to brandish all AWS services, clickIAMunderSecurity, Identity, & Compliancesection to navigate to IAM console. Or you may utilize this link - Click
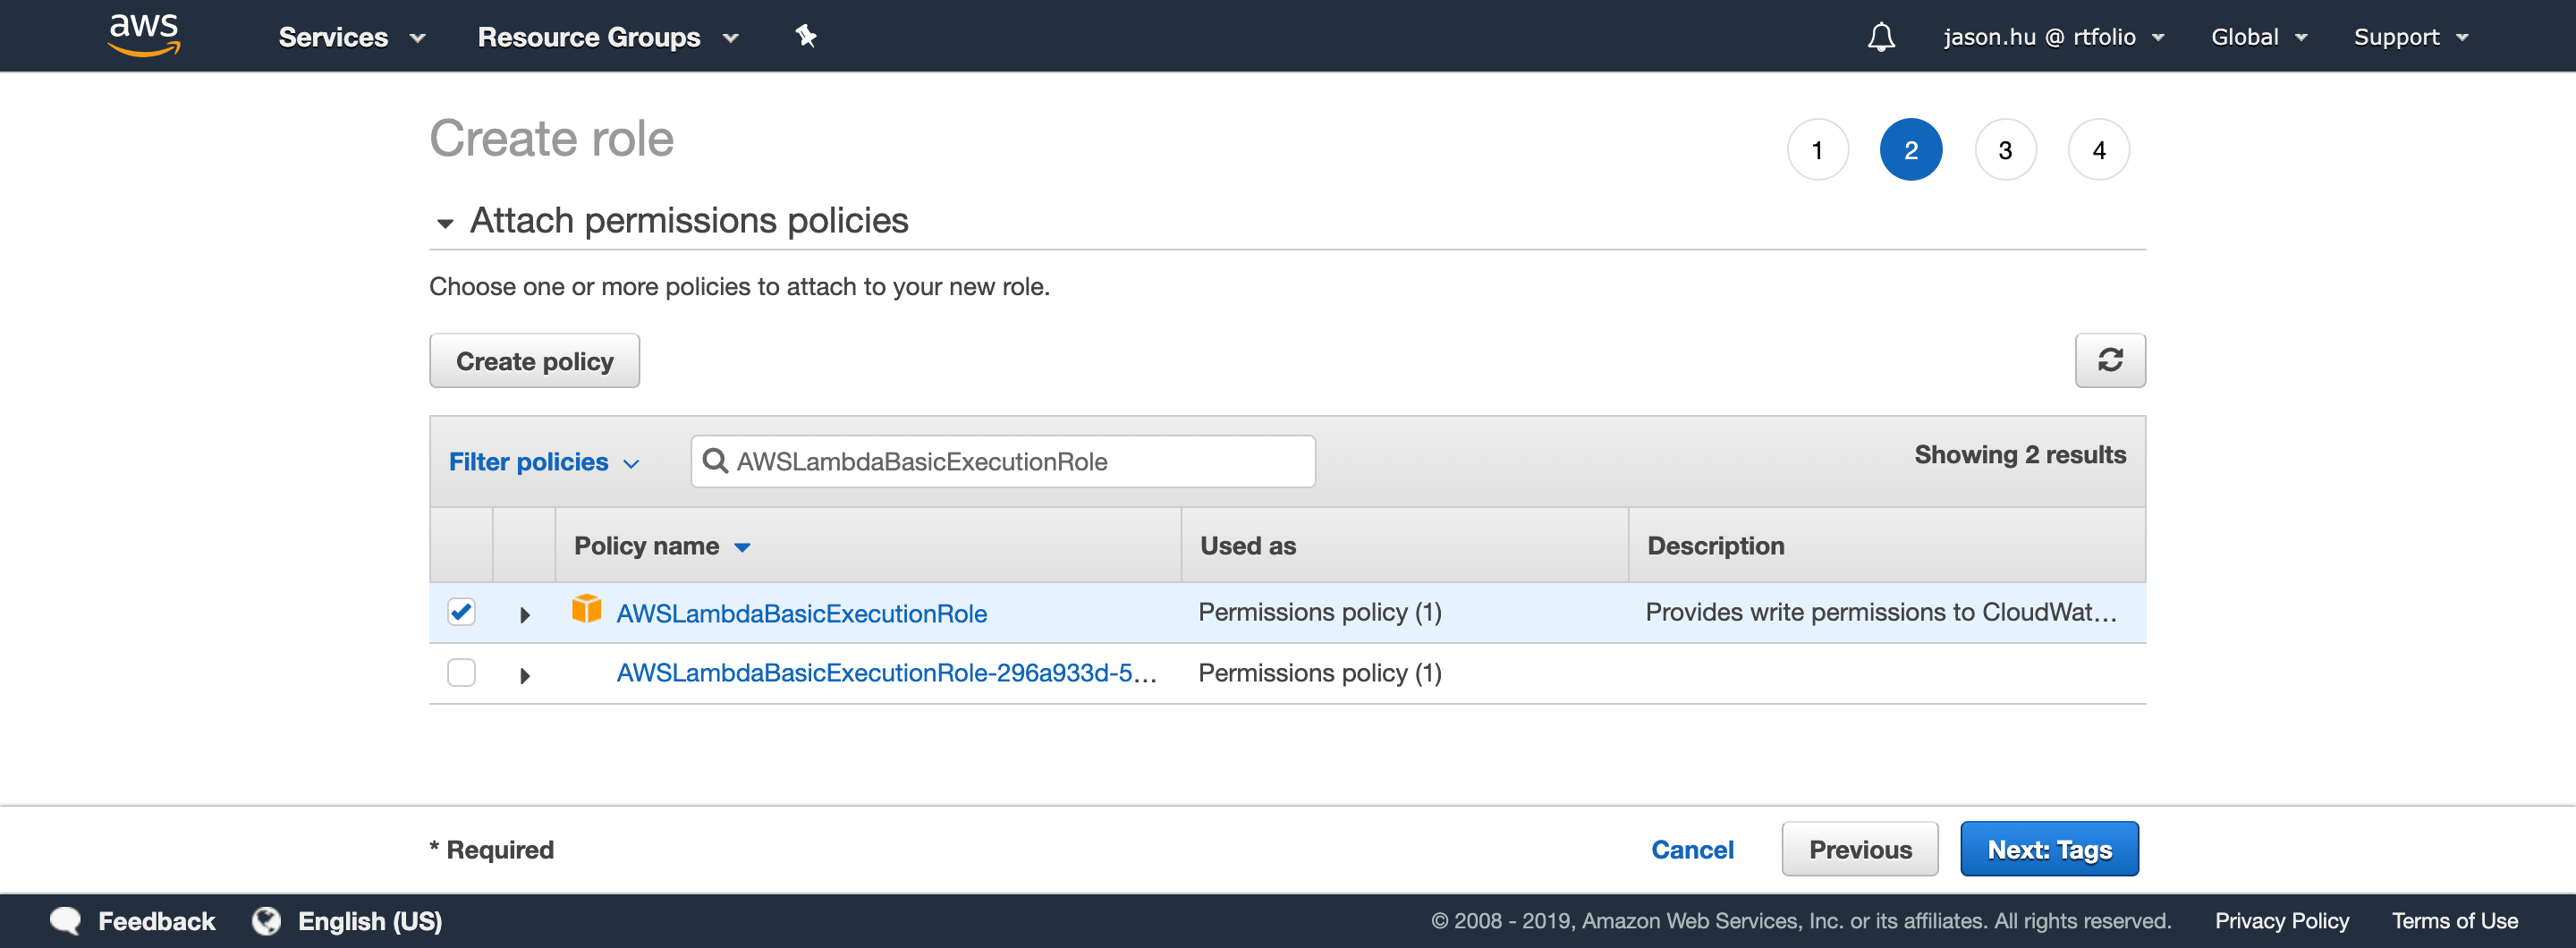
Rolesin the left panel, then clickCreate role, selectAWS Service->Lambdain the first page of the sorcerer, then clickNext: Permissions - Select
AWSLambdaBasicExecutionRolepolicy, and then clickNext: Tags. (Tips: you tin use the search box to filter the policy)
- You tin can skip
Add tagspage, clickNext: Review. - Give your new function a name, such as
AWSLambdaBasicExecutionRole-Intents, then clickCreate partpush. You should be able to notice your new role in the roles listing now.
Create a Lambda function and add code
Adjacent yous need to create a Lambda function.
- Click
Servicein top navigation bar, aggrandize the menu to brandish all AWS services, clickLambdaunderComputesection to navigate to the Lambda console. Or y'all may use this link - Important Your current region will be displayed in the top correct corner. Make certain yous select the right region based on your Amazon account'south state:
- United states of america Eastward (Northward.Virginia) region for English language (U.s.) or English (CA) skills
- EU (Ireland) region for English (UK), English (IN), German (DE), Spanish (ES) or French (FR) skills
- U.s.a. Due west (Oregon) region for Japanese and English (AU) skills.
- Click
Functionsin the left navigation bar, display list of your Lambda functions. - Click
Create function, selectAuthor from scratch, then input aFunction name. - Select Python 3. as
Runtime(Python 3.9 was available at this time). - Select Utilise an existing office equally
Execution role, then select the role you just created from theExisting officelist. - Click
Create function, then you can configure the details of the Lambda function. - Under the
Configurationtab, expandDesigner, and then click on+ Add triggerin the left part of the panel and selectAlexa Skills Kitfrom the dropdown list to add together an Alexa Skills Kit trigger to your Lambda function. - Curlicue down a piffling bit, you need to input the
Skill IDfrom the skill you created in the previous stride. (You may need to switch back to the Alexa Programmer Panel to copy theSkill ID). - Click your Lambda Part icon in the center of the diagram and scroll downwards, you will see a
Role lawmakingwindow. - Articulate the example code and re-create the Python script from this GitHub Gist.
- Click the
Deploypush button of theRole codewindow. - Ringlet down again and you volition find
Surround variables, click onEditbutton and add the post-obit environment variables as needed:- BASE_URL (required): your Home Assistant example's Internet accessible URL with port if needed. Exercise not include the abaft
/. - NOT_VERIFY_SSL (optional): set up to Truthful to ignore the SSL issue, if yous don't have a valid SSL document or y'all are using self-signed certificate.
- DEBUG (optional): set to True to log debugging letters.
- LONG_LIVED_ACCESS_TOKEN (optional, not recommended): you will connect your Alexa Custom skill with your Habitation Banana user account in the later steps, so that you don't need to use long-lived access token here. However, the admission token y'all got from login flow is only valid for 30 minutes. It will be hard for y'all to exam lambda role with the access token in test information. And so for your convenience, you can remove the access token from the test data, generate a long-lived access token to put here, then the function will autumn back to reading the token from surround variables. (tips: You did not enable the security storage for your environment variables, and then your token saved here is non that safe. You should only use it for debugging and testing purpose. You should remove and delete the long-lived access token afterward yous terminate the debugging.)
- BASE_URL (required): your Home Assistant example's Internet accessible URL with port if needed. Exercise not include the abaft
- Save your environmental variables by clicking the
Salvagebutton. - Next, copy the ARN displayed at the top of the page, which is the identity of this Lambda office.
- Go back to your Alexa skill and go to the Custom->Endpoint menu pick on the left.
- Paste the ARN value in the "Default Region". Note: you volition not exist able to do this until you take completed the step above calculation the Alexa Skills Kit trigger (washed in the previous pace) to the AWS Lambda Function.
Account Linking
Alexa can link your Amazon account to your Home Assistant account. Therefore Habitation Assistant can brand certain only authenticated Alexa requests are actioned. In lodge to link the account, you have to make sure your Home Assistant instance tin be accessed from the Internet.
- Log in to the Amazon developer console
- Go to the
Alexa Skillspage. - Find the skill you just created and click
Editin theActionscolumn. - Click
ACCOUNT LINKINGin the left navigation bar of the build folio - Input all information required. Bold your Home Assistant tin can be accessed by
https://[YOUR Domicile ASSISTANT URL:PORT]-
Authorization URI:https://[YOUR Habitation Banana URL]/auth/authorize -
Access Token URI:https://[YOUR HOME ASSISTANT URL]/auth/token- Note: you lot must employ a valid/trusted SSL Document and port 443 for business relationship linking to work
-
Client ID:-
https://pitangui.amazon.com/if y'all are in US -
https://layla.amazon.com/if you are in EU -
https://alexa.amazon.co.jp/if yous are in JP or AU
The abaft slash is of import here.
-
-
Client Surreptitious: input annihilation you like, Dwelling Assistant does not check this field -
Customer Authentication Scheme: make sure you selected Credentials in request body. Home Banana does non back up HTTP Basic. -
Telescopic: inputintent. Home Banana doesn't use this yet, we may use it in the hereafter when we allow more fine-grained access control.
-
- You can go out
Domain ListandDefault Access Token Expiration Timeas empty.

- Click
Salvepush button in the acme right corner. - Next, you will apply the Alexa Mobile App or Alexa web-based app to link your account.
- Open the Alexa app, navigate to
Skills->Your Skills->Dev Skills - Click the Custom skill you merely created.
- Click
Enable. - A new window volition open to directly y'all to your Home Assistant's login screen.
- After you successfully login, you volition be redirected back to Alexa app.
- Open the Alexa app, navigate to
Configuring your Amazon Alexa skill
Alexa works based on intents. Each intent has a name and variable slots. For example, a LocateIntent with a slot that contains a User. Example intent schema:
{ "intents" : [ { "intent" : "LocateIntent" , "slots" : [ { "proper name" : "User" , "type" : "AMAZON.US_FIRST_NAME" }] }, { "intent" : "WhereAreWeIntent" , "slots" : [] } ] } To bind these intents to sentences said past users you define utterances. Case utterances can look similar this:
LocateIntent Where is {User} LocateIntent Where's {User} LocateIntent Where {User} is LocateIntent Where did {User} go WhereAreWeIntent where we are This means that we can now ask Alexa things like:
- Alexa, ask Home Assistant where Paul is
- Alexa, enquire Home Banana where we are
Configuring Home Assistant
When activated, the Alexa integration will have Dwelling Banana's native intent support handle the incoming intents. If y'all want to run actions based on intents, employ the intent_script integration.
To enable Alexa, add together the following entry to your configuration.yaml file:
Working With Scenes
One of the most useful applications of Alexa integrations is to telephone call scenes directly. This is easily accomplished with some unproblematic setup on the Home Assistant side and past letting Alexa know which scenes you want to run.
First, we volition configure Alexa. In the Amazon Interaction module add together this to the intent schema:
{ "intent" : "ActivateSceneIntent" , "slots" : [ { "name" : "Scene" , "type" : "Scenes" } ] } And then create a custom slot blazon called Scenes listing every scene you desire to control:
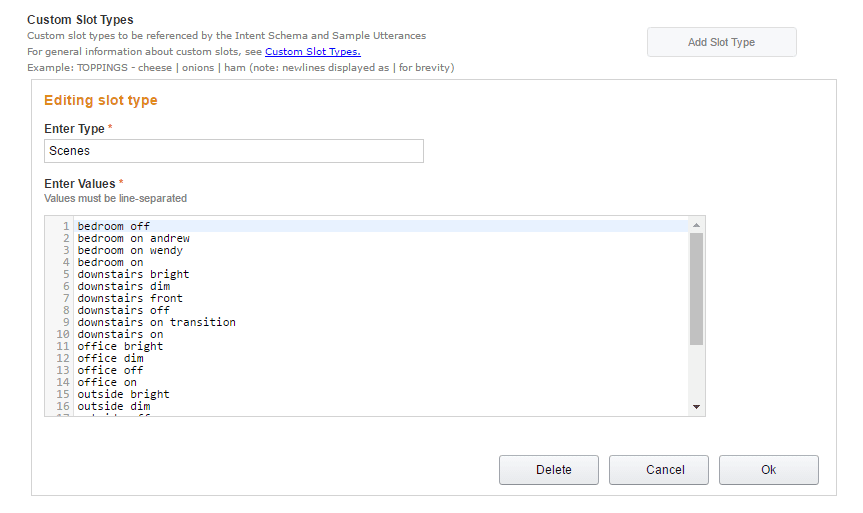 Custom slot type for scene support.
The names must exactly friction match the scene names (minus underscores - Amazon discards them anyhow and we later map them dorsum in with the template).
In the new Alexa Skills Kit, you can also create synonyms for slot blazon values, which tin can be used in place of the base value in utterances. Synonyms will be replaced with their associated slot value in the intent request sent to the Alexa API endpoint, just only if there are not multiple synonym matches. Otherwise, the value of the synonym that was spoken will be used.
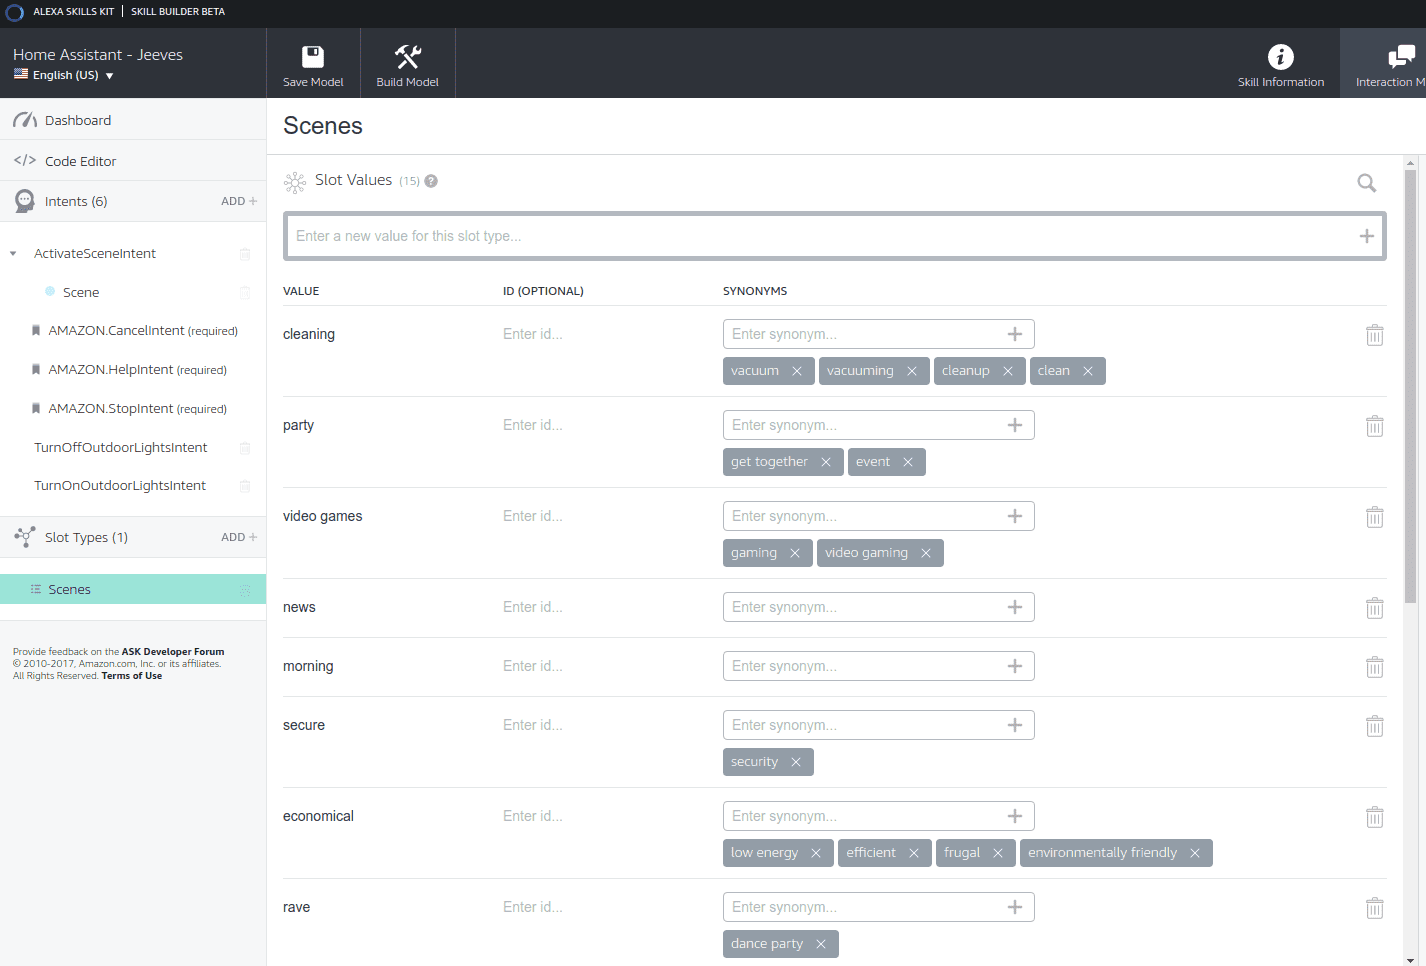 Custom slot values with synonyms.
Add a sample utterance:
ActivateSceneIntent actuate {Scene} Then add the intent to your intent_script section in your HA configuration file:
intent_script : ActivateSceneIntent : activeness : service : scene.turn_on target : entity_id : scene.{{ Scene | replace(" ", "_") }} speech : blazon : plain text : OK Here we are using templates to take the name we gave to Alexa e.one thousand., downstairs on and replace the space with an underscore so information technology becomes downstairs_on as Home Assistant expects.
Now say Alexa ask Home Assistant to activate <some scene> and Alexa will activate that scene for you.
Adding Scripts
We tin can easily extend the above idea to work with scripts likewise. Every bit before, add an intent for scripts:
{ "intent" : "RunScriptIntent" , "slots" : [ { "proper noun" : "Script" , "type" : "Scripts" } ] } Create a custom slot type called Scripts listing every script yous want to run:
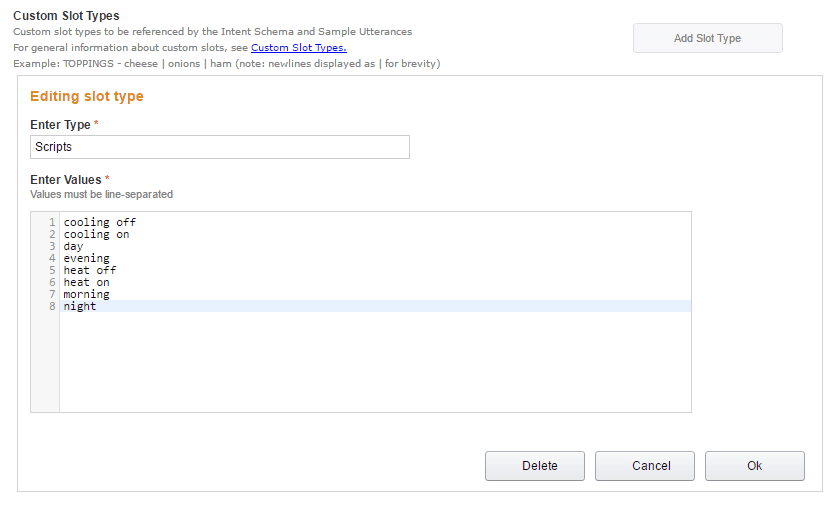 Custom slot type for script support.
Add together a sample utterance:
RunScriptIntent run {Script} Then add together the intent to your intent_script department in your HA configuration file:
intent_script : RunScriptIntent : activity : service : script.turn_on target : entity_id : script.{{ Script | replace(" ", "_") }} speech : blazon : apparently text : OK At present say Alexa ask Dwelling house Assistant to run <some script> and Alexa will run that script for y'all.
Support for Launch Requests
There may be times when you want to reply to a launch request initiated from a command such as "Alexa, Red Alarm!".
To outset, y'all need to go the skill id:
- Log into Amazon developer console
- Click the Alexa push button at the top of the console
- Click the Alexa Skills Kit Get Started button
- Locate the skill for which you would like Launch Request support
- Click the "View Skill ID" link and re-create the ID
The configuration is the same every bit an intent with the exception being you will utilize your skill ID instead of the intent name.
intent_script : amzn1.ask.skill.08888888-7777-6666-5555-444444444444 : activity : service : script.turn_on target : entity_id : script.red_alert speech : type : manifestly text : OK Giving Alexa Some Personality
In the examples above, we told Alexa to say OK when she successfully completed the task. This is effective but a little dull! Nosotros can once more use templates to spice things upwardly a little.
Get-go create a file called alexa_confirm.yaml with something similar the post-obit in it (go on, be creative!):
> {{ [ "OK", "Certain", "If you insist", "Done", "No worries", "I can practice that", "Get out it to me", "Consider it washed", "As you wish", "By your command", "Affirmative", "Yes oh revered one", "I will", "As you decree, so shall it exist", "No Problem" ] | random }} Then, wherever yous would put some uncomplicated text for a response like OK, replace it with a reference to the file so that:
becomes:
text : !include alexa_confirm.yaml Alexa will now answer with a random phrase each fourth dimension. You can use the include for every bit many different intents as you like then yous only need to create the list once.
Help us to ameliorate our documentation
Suggest an edit to this page, or provide/view feedback for this page.

Source: https://www.home-assistant.io/integrations/alexa.intent/
Posted by: gaulkesumbing1949.blogspot.com
0 Response to "How To Send Commands To Alexa Web Service"
Post a Comment